Liam H.
Jun 23, 2026
•17 minutes
Mechanical Keyboard Switches: A Spec-First Buying Guide
Stop shopping for mechanical keyboard switches by color. Learn the specs, popular models, lube, plates, and builds that actually decide how a switch feels.
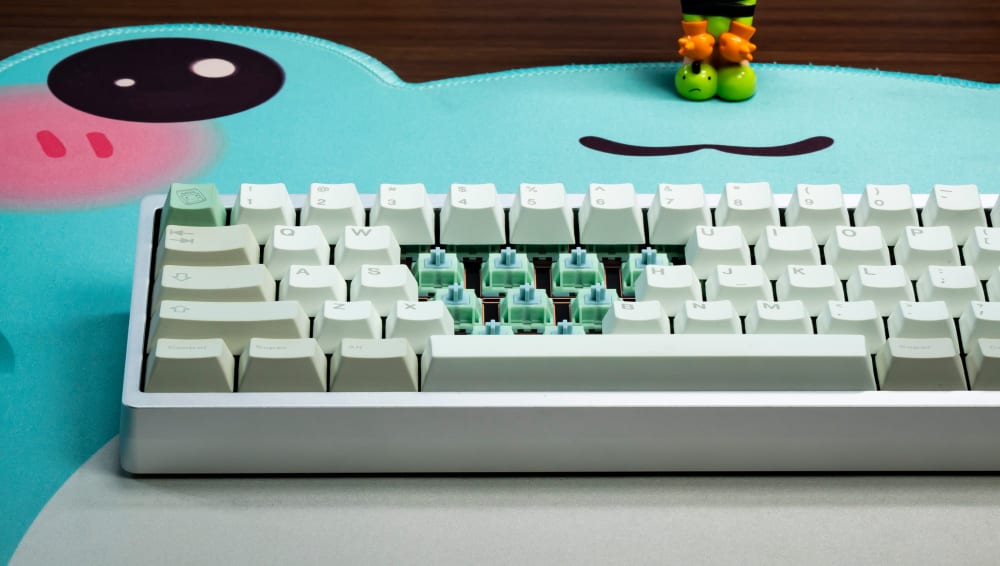
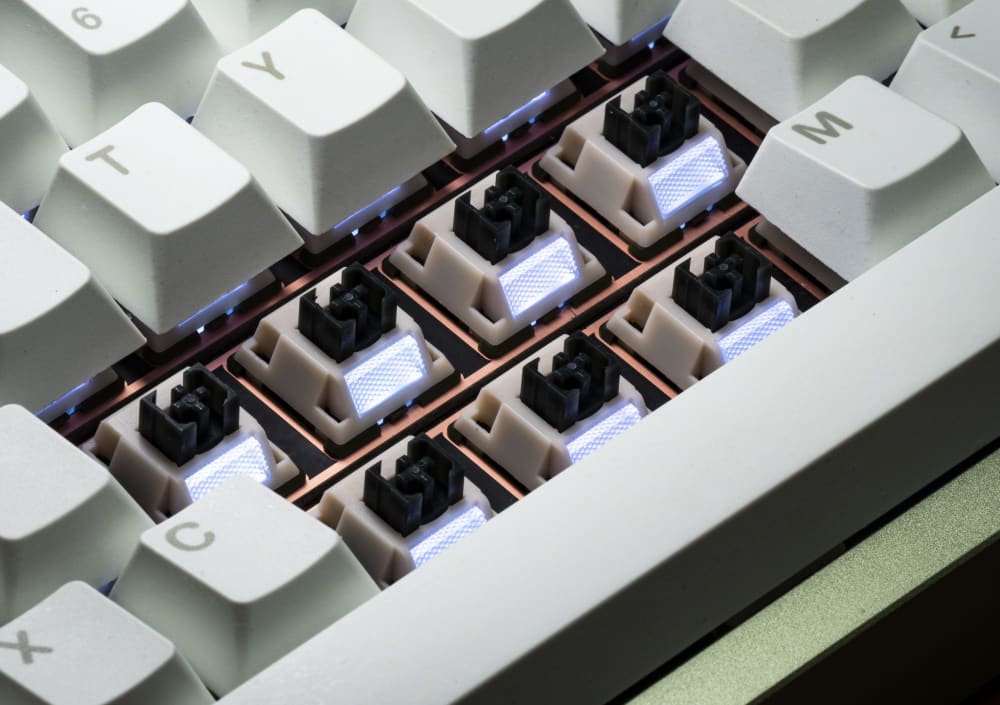
HMX Frog Tactile Switches
Most guides on mechanical keyboard switches stop at the colors. Red is linear, brown is tactile, blue is clicky, pick one and good luck. That framing is fine for a first purchase and useless for everything after. I learned that the slow way, buying my first "tactile browns" off a chart, plugging them in, and wondering why the bump I'd been promised felt like a rumor.
The switches you actually end up loving are chosen by numbers: gram-force at actuation versus bottom-out, pre-travel distance, stem material, pin count, and how all of that gets amplified or muffled by the plate underneath. This guide walks through the measurable stuff so you can read a spec sheet and predict how a mechanical keyboard switch will feel before it ever lands in your hands.
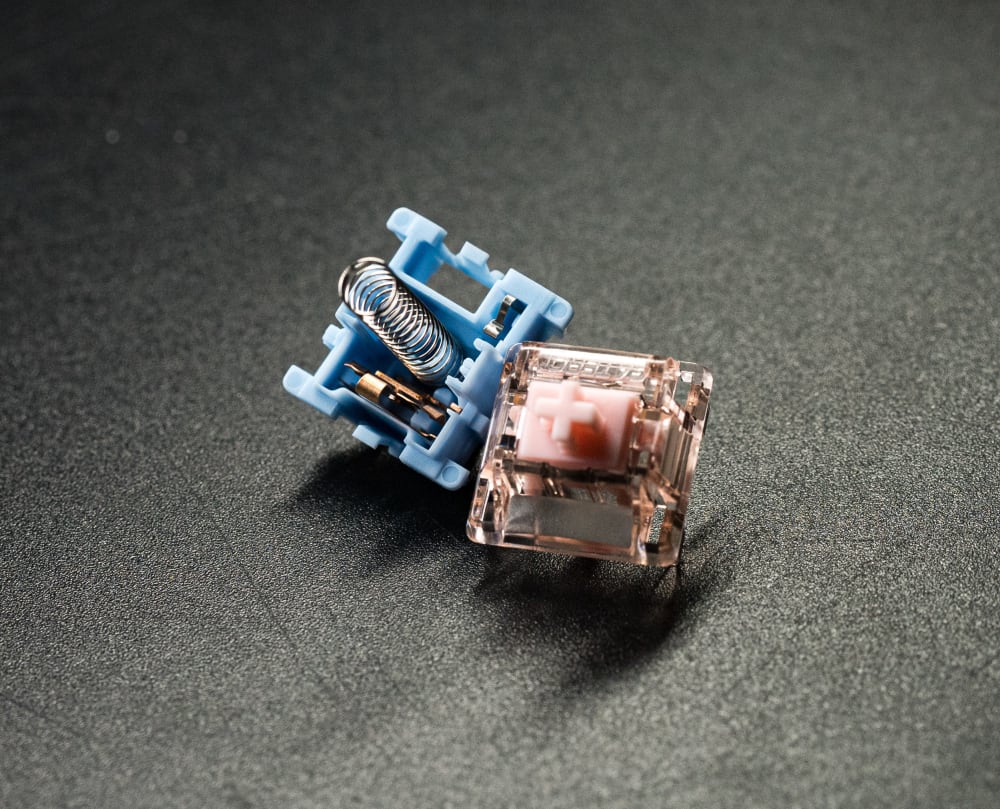
What Actually Happens Inside a Mechanical Switch
An MX-style switch is five parts doing five jobs. The top housing guides the stem and holds everything captive. The bottom housing carries the spring and the metal leaf, and it's the part that contacts your plate and PCB. The stem rides up and down through the middle and is the piece your keycap clips onto. The spring sets how heavy the keypress feels and pushes the stem back up after each press. The leaf, a thin bent piece of metal sheeting, is the contact that actually registers your keystroke when the stem's legs let it close.

Moon V2 Switches Opened
If you want the full picture of how those parts get molded, stamped, and pressed together, our breakdown of how mechanical keyboard switches are made covers it in detail. What matters here is the force curve those parts produce. Press a key and you move through pre-travel (the distance before anything registers), reach the actuation point (the leaf closes, the keystroke counts), and then keep going to bottom-out (the stem hits the housing floor).
On tactile and clicky switches there's a feedback event somewhere in that travel. On a linear there isn't. The first time I pulled apart a dead switch at a meetup just to see those five parts move, the whole hobby clicked into place for me, and I've been chasing force curves instead of colors ever since.
How the leaf creates tactile or clicky feedback
The bump you feel on a tactile switch comes from the shape of the stem leg pushing against that leaf. A wider or steeper leg forces the leaf to deflect harder right before actuation, and that resistance is the bump. Clicky switches add a second moving piece, either a click jacket or a click bar, that snaps to make the noise. Linear switches use a smooth stem leg with no abrupt profile change, so the leaf gives way evenly the whole way down. That's the entire difference. A linear uses a different stem geometry interacting with the same leaf, so the behavior is distinct from a tactile at a design level, not just in marketing terms.

Baby Kangaroo Tactile Opened
Stem material and why it changes the sound
Stem material is one of the biggest levers on smoothness and sound, and it gets glossed over constantly. POM is the default for a reason: it's self-lubricating and naturally smooth, which is why so many linears use it, including the HMX Butter Linear. Nylon housings tend to read deeper and more muted. UHMWPE stems are slick almost to a fault and produce a softer, rounder sound. None of these are better in the abstract. They're tools, and the right one depends on whether you want a sharp clack or a deep thock. I keep a little tray of single switches in different stem materials on my desk, and every time someone insists a switch "sounds bad," I hand them two with identical weights and different stems and watch them change their mind.

HMX Butter Linear Switch Front & Back
Popular Switch Brands and Models Worth Knowing
You don't need to memorize a catalog, but knowing what's actually moving off shelves saves you from chasing dead hype. A few that consistently earn their reputation: the HMX Butter Linear and HMX Latte Linear are the linears I recommend most often when someone wants smooth and deep without any fuss. The HMX Frog Tactile and Turtle Silent Tactile cover the tactile side, one with a clean bump and one for people who need to stay quiet. On the linear bench I keep coming back to the Capybara Linear for its rounded, marbly bottom-out, the Gateron Gecko Silent Linear when the room demands silence, and the Moon V2 Linear for a slightly firmer landing. I've handed all of these around at meetups, and they're the ones that get the "wait, what is that one?" reaction more than the boutique stuff that's been out of stock for a year.
The reason I lean on these specifically: they're popular and they're in stock. Half the switches that win comment-section arguments online were a limited groupbuy that sold out in 2022. A mechanical keyboard switch you can actually buy in the quantity your board needs beats a legendary one you'll never find.

Capybara Switches on a Keyboard
The Three Switch Types Explained With Real Numbers
Vague adjectives are the reason switch advice falls apart. "Smooth," "thocky," and "snappy" mean different things to everyone, as we got into in our piece on why keyboard sound is basically impossible to get right. I've been fooled myself at meetups, swearing a switch was "buttery" right up until I checked the gram-force and realized I was reacting to a light spring, not actual smoothness. Numbers don't have that problem.
The colors everyone starts with are manufacturer shorthand, not a standard. Cherry set the convention decades ago and most brands followed loosely: red means linear, brown means light tactile, blue means clicky. The trouble is that the convention only holds within a single brand's lineup, and even then the spring weight and bump strength vary wildly between makers. A "brown" from one company can have a bump you'd struggle to feel while another company's brown is genuinely sharp. I've watched two people argue about brown switches at a meetup for ten minutes before realizing they were holding entirely different switches that happened to share a color.

Turtle Silent Tactile Switch Front and Back
So when people ask me which is better, blue, red, or brown, my honest answer is none of them. Reds (linear) give you a constant force curve with nothing interrupting the keypress, which most people find the least distracting for fast typing and gaming. Browns (tactile) add a bump so you can feel the actuation point, which some typists prefer for accuracy. Blues (clicky) are loud and satisfying and terrible in a shared office. Pick based on what you want to feel and how much noise you can live with, not on which color a forum thread told you was best. Treat color as a starting hint and read the actual gram-force and travel specs before you buy.
Linear: constant force, low distraction
Linears run anywhere from roughly 35g to 67g actuation, and that spread matters more than the type label. The HMX Butter Linear sits in the light-to-medium range that most people get along with immediately, feeling smooth at the top and landing soft. A flatter spring keeps the press consistent the whole way; a more progressive one firms up considerably by the time you hit the floor. The HMX Latte Linear and Capybara Linear make sensible first linears if you don't want to overthink it, and they're both in stock, which is half the battle.
HMX Latte Switches Front and Back
Tactile: where the bump lives
Two tactiles can share the same gram-force and feel nothing alike depending on where the bump sits. A bump right at the top of travel (think the snappier tactiles like the HMX Frog Tactile) hits before you've committed to the press, which feels crisp for typing. A mid-travel bump feels rounder and mushier. Bump position, not just bump size, is the spec to chase, and it's almost never printed clearly, so you often have to read a force curve graph to find it. I once spent a whole evening at a meetup convinced two tactiles were the same switch in different colors until someone pulled the graphs up and the bump positions were nowhere near each other.

HMX Frog Tactile Front and Back
Clicky: click bar versus click jacket
Older clicky designs use a click jacket, a separate sleeve around the stem that catches and releases as the stem moves. They work but they wobble more and they're sensitive to dust getting into the mechanism. Click bar designs like the Kailh BOX V2 White (45g actuation, 50g bottom-out) move the clicking element into the bottom housing and use a stiff metal bar instead. The result resists stem wobble better and the sealed BOX housing keeps dust out. That tight 5g gap between actuation and bottom-out also gives it a confident, defined floor rather than a vague squish.
Gateron Melodic Clicky Switch Opened
Pre-lubricated vs Unlubricated Switches
Almost every switch I buy now ships pre-lubricated with a light factory oil, and I'm not mad about it. The HMX and Capybara lines come with a coat that knocks the worst scratch off the rails straight out of the bag. An unlubricated switch is a blank canvas: raspier on day one, but yours to tune exactly. The choice really comes down to whether you want to do the work. If you've never lubed a switch and don't want to start, buy pre-lubricated and you'll be perfectly happy. If you enjoy the modding side, an unlubricated switch gives you full control and won't fight the lube you eventually add. I keep both around, factory-lubed switches for boards I want done tonight, and bare ones for the projects I want to fuss over.
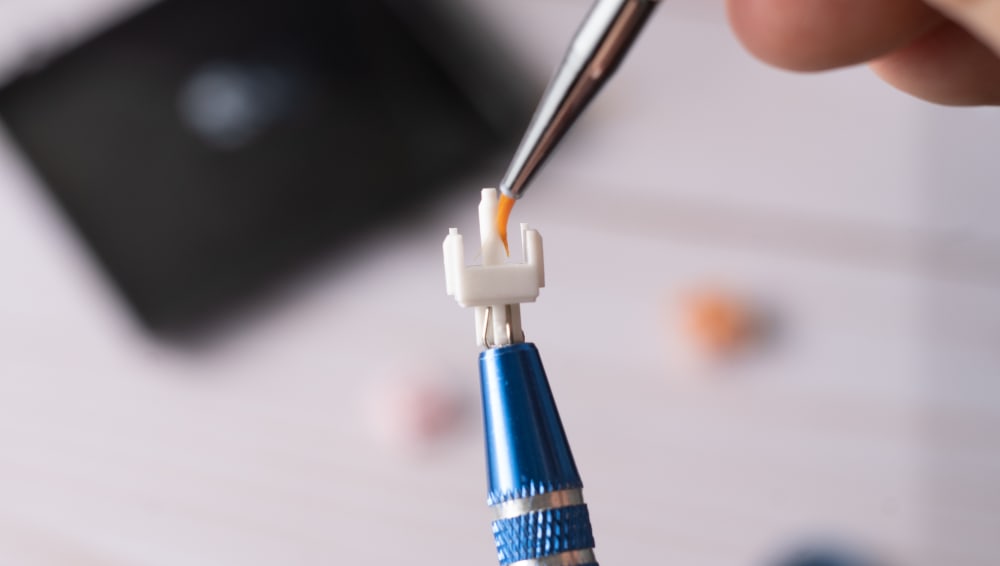
Hand Lubing a Switch
How 5-Pin vs. 3-Pin Affects PCB Compatibility
This is the section almost every competing guide skips, and it's the one that wrecks build plans. Switches come with either three pins or five. The two metal contact pins are always there. The difference is the extra plastic alignment legs.
A 5-pin switch has two plastic pegs flanking the center pole that slot into matching holes on a PCB-mount board, holding the switch dead square. A 3-pin switch drops those pegs. On a plate-mount build the plate does the alignment work, so the pegs aren't needed. The full tradeoff between the two mounting styles is laid out in our guide to plate-mount vs. PCB-mount switches.
Clipping 5-pin switches to fit 3-pin boards
If you have a 5-pin switch and a 3-pin (plate-mount) PCB, you clip the two plastic pegs off with flush cutters. It's quick and safe as long as you don't nick the center pole or the metal pins. Plenty of switches, including the HMX Latte Linear, ship 5-pin and can be clipped down for 3-pin boards. You lose a little of the squared-up rigidity the pegs provided, but on a board with a solid plate the plate already handles that, so the practical difference is small. Going the other way is the hard direction: a 3-pin switch will physically seat in a 5-pin board, it just won't get the extra alignment, which is usually fine. The first time I clipped a full set I held the cutters at the wrong angle on switch number three and shaved the center pole; do it under good light and check the first few before you go on autopilot.
How PCB-mount switches shape sound
PCB-mount switches sit directly against the board, so the PCB material colors the result. A stiff FR4 PCB transmits a sharper, higher sound. Polycarbonate is softer and reads deeper and more muted. Flex-cut PCBs (with material removed around the switches) give and absorb energy, softening the bottom-out. A 5-pin switch like the BOX V2 White locked tight against a flex-cut poly board sounds nothing like the same switch on rigid FR4.
Hotswap vs Soldered Switches
How your board holds the switch changes everything about how you live with it. A hotswap board has little sockets that grip the switch pins, so you press a switch in and it works, no iron required. That's how I test most switches now: I'll swap four different linears through the same board in an afternoon and feel them in context without committing to anything. The tradeoff is that hotswap sockets are a touch less rigid and can wear out if you yank switches carelessly. A soldered board fixes the pins permanently to the PCB, which is rock solid and slightly better for sound and stability, but changing your mind means a desoldering session. If you're still figuring out what you like, build hotswap. If you've found your endgame switch and want maximum stability, soldering is worth the commitment.
How Plate Material Amplifies or Dampens Your Switch Choice
You cannot pick a switch in a vacuum. The plate it mounts to changes the feel and sound as much as the switch itself does, sometimes more.
Brass vs. aluminum vs. polycarbonate vs. POM
Harder plates ring higher and stiffer. Brass is dense and resonant, giving a bright, sharp, fairly stiff bottom-out. Aluminum is the middle-of-the-road default, balanced and a touch softer than brass. Polycarbonate is flexible and forgiving, dampening high frequencies and adding bounce. POM plates are softer still and read deep and muted with a noticeable flex. The same switch will feel firmer on brass and softer on POM with nothing else changed. I once put the exact same Capybara Linears in two boards on the same table, one brass and one POM, and a friend refused to believe they were the same switch until I let him pull one from each.

Brass Keyboard Plate
Why a clicky switch is a different animal on brass than POM
Put a clicky BOX V2 White on a brass plate and the rigid plate reinforces the high-frequency click, making it sharper and louder. Drop the identical switch on a POM plate and the soft plate absorbs some of that energy, rounding the click and lowering the perceived volume. People blame the switch for sounding wrong when the plate is doing half the talking.
Flex cuts and gasket mounts
Flex cuts and gasket mounting both let the assembly move when you bottom out. That movement bleeds off some of the impact, so a 50g bottom-out switch can feel softer and lighter on a flexy gasket board than its spec suggests. The gram-force on the spec sheet is the same. Your perception of it changes because the structure under the switch is giving way with you.
Building a Custom Keyboard Around Your Switches
When I build a custom keyboard, the switch is the last thing I lock down, not the first, because everything else votes on how it ends up feeling. The order I've settled into after a few too many rebuilds: pick the case and mounting style, then the plate material, then the PCB, and only then choose a mechanical keyboard switch whose force curve fits the structure I've already committed to. A light, smooth linear like the HMX Latte Linear on a flexy gasket board with a POM plate is a completely different keyboard than the same switch bolted to a brass plate in a stiff tray-mount case. Buy enough switches in one go (most boards need 70 to 100), confirm pin count against your PCB before you order, and account for keycap fit. I've built dozens of boards and the ones that disappointed me almost always came from picking the switch first and forcing the rest of the build to apologize for it.
Reading the Spec Sheet: What the Numbers Actually Tell You
At the broadest level there are three families of switch: linear, tactile, and clicky, each defined by what happens in the travel. Inside those families, the spec sheet is what separates a great switch from a mediocre one. People sometimes ask me whether mechanical switches are even better than membrane, and for most people the answer is yes: they last longer, they're individually replaceable, and they give you control over feel and sound that a rubber dome can't. Whether one mechanical switch is better than another, though, is entirely down to the specs matching your use. Our guide on what to look for when buying switches goes deep, but here are the numbers that earn their place.
Actuation force vs. bottom-out force
The gap between these two numbers predicts mushiness. Take the BOX V2 White: 45g actuation, 50g bottom-out, a 5g delta. That small gap means the switch firms up quickly and gives you a defined floor. A switch with a 45g actuation but a 65g bottom-out climbs more gradually, which some people read as soft or progressive and others read as mushy. Neither is wrong, but the delta tells you which camp you're in before you buy.
Pre-travel distance
Pre-travel is how far you press before actuation. The BOX V2 White actuates at 2mm. Some gaming-focused switches actuate as shallow as 1.2mm. Shorter pre-travel means faster registration, which gamers want, but it also means accidental presses are easier when you rest your fingers. For typing, a 2mm pre-travel gives you margin against misfires.
Total travel, reset point, and hysteresis
Total travel is usually 3.5mm to 4mm. The reset point is where the switch un-registers on the way up, and hysteresis is the gap between actuation and reset. A switch with low hysteresis (actuation and reset close together) feels responsive and consistent, which is why it matters for double-tapping and rapid input. These specs get ignored constantly and they're exactly what separates a switch that feels precise from one that feels vague.
LED compatibility: SMD vs. in-switch
SMD LEDs are surface-mounted on the PCB and shine up through a window in the switch housing. For that to work the housing has to have the cutout, and SMD-compatible switches like the BOX V2 White (and most modern switches, including the HMX and Capybara lines) do. If you're planning an RGB build, confirm the housing is SMD-compatible and that your PCB has the LEDs in place. In-switch LEDs are the older through-hole approach and far less common now.
Turtle Switches with RGB Lights
Durability and Build Quality
A good mechanical keyboard switch is rated for tens of millions of presses, and the better-made ones actually live up to it. What I look for after years of pulling switches apart: tight housing tolerances so there's no stem wobble, a leaf that holds its tension over time, and clean mold work with no flash on the stem rails. The HMX line in particular has spoiled me on tolerances; the stems sit snug without binding. Cheaper switches tend to give themselves away with inconsistent springs and gritty rails that get worse, not better, with use. You can feel build quality before you ever count keypresses: a switch that wobbles or sounds gritty new is telling you something. I've got boards I built five years ago still typing exactly as they did on day one, and they all used switches that felt tight and consistent out of the bag.
Color Variants and Aesthetic Options
Yes, I just spent this whole guide telling you to stop shopping by color, and yes, I still care how my switches look. The two aren't in conflict: choose the switch by its curve, then enjoy that good switches now come in genuinely pretty housings. The HMX linears in particular ship in tasteful colorways that look great under shine-through keycaps or in an open-frame build. If you run translucent or low-profile keycaps, the switch housing becomes part of the aesthetic, so matching the housing color to your keycap set is a real consideration. Just make that the tiebreaker between two switches you already like on feel, not the reason you buy one. I've absolutely picked between two equally good linears based on which one matched the deskmat, and I won't pretend otherwise.
Switch Replacement and Maintenance
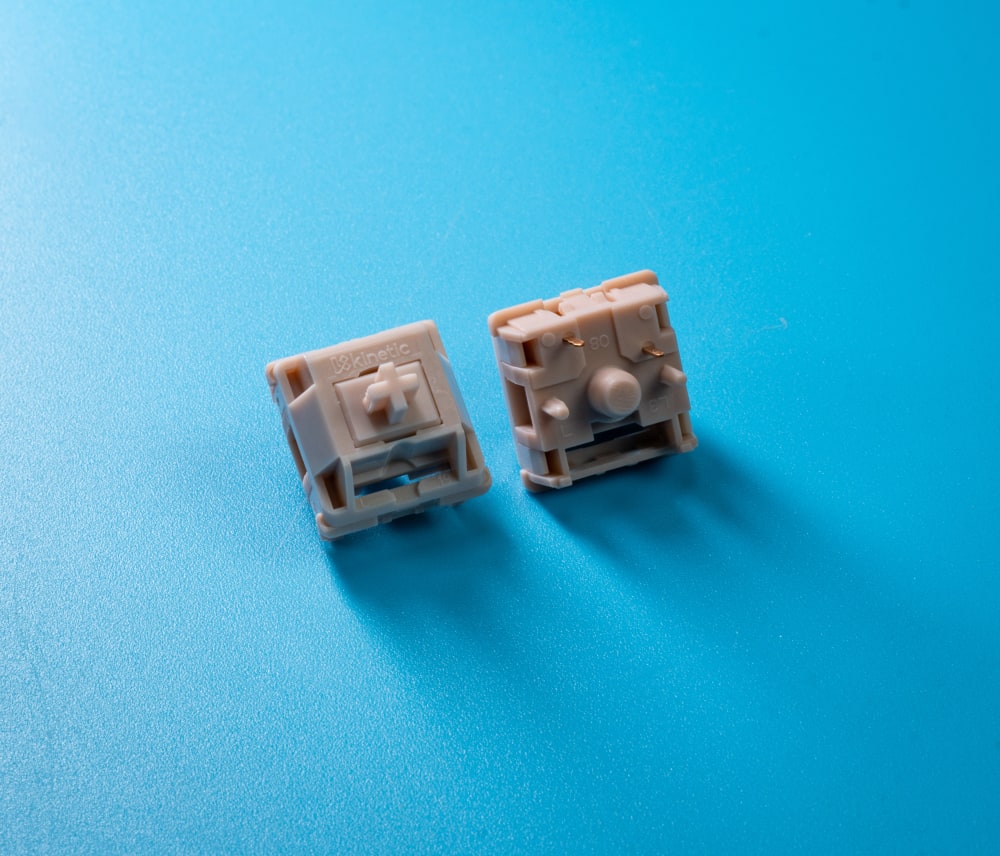
The best thing about mechanical switches is that one dying switch isn't a dead board. On a hotswap board, replacing a switch takes about ten seconds: pull the keycap, pull the switch with a puller, press the new one in. On a soldered board it's a desolder-and-resolder job, more involved but still routine. Maintenance is mostly about dust and the occasional re-lube. Every year or so I'll pull a few switches from my daily board, blow the dust out, and check the rails; if a linear has started to feel scratchier than I remember, a fresh lube brings it right back. Keep a handful of spare switches from your original set so a replacement always matches, and keep a puller in your desk drawer. To actually open and service switches you need the kit: our rundown of tools to mod your switches covers it, but the two essentials are a Switch Puller (the $5.99 Kinetic Labs one with the rubber grip and stainless jaws pulls switches without chewing the housing) and a switch opener. The Mini Bear 2-in-1 Opener comes in black, pink, and e-white and handles both Cherry MX and Kailh latch styles in one tool, which matters because those two latch designs don't open the same way.

Opening a Switch
Waterproof and Dustproof Switches
No MX-style switch is truly waterproof, and anyone selling you one is stretching the word. What you can get is dust and splash resistance, and that's mostly down to housing design. The Kailh BOX family, including the BOX V2 White, uses a sealed box stem that walls off the leaf and click mechanism from the outside world, which is why those switches shrug off dust and the odd coffee splash far better than an open Cherry-style housing. If you work somewhere dusty, eat at your desk, or just have a cat that treats your keyboard as a bed, a boxed switch buys you real peace of mind. I keep a boxed board on the kitchen counter for exactly this reason. It is not an invitation to dunk your keyboard, but it survives the splashes an open-stem switch wouldn't.
Factory Lube, No Lube, and DIY Lube: How It Changes Everything
Most switches now ship with a light factory oil. The HMX and Capybara linears in our lineup have it. That light coat knocks the worst scratch off the rails but it's thin and unevenly applied, because a machine sprays it fast.
What factory lube does and doesn't do
It reduces friction enough that the switch isn't raspy out of the box. It does not eliminate spring ping, it doesn't smooth the stem fully, and it's never as even as hand lubing. Think of it as a floor, not a finish.
Which switches benefit from a hand lube job
Linears gain the most. A proper lube turns a decent linear into a glassy one; the first time I hand-lubed a set of HMX linears I sat there flicking a single switch for far longer than I'd admit. Tactiles benefit too, but you have to be careful around the bump, since over-lubing the legs rounds it off and you lose the tactility you paid for. Clicky switches are the exception: never lube a click bar. Oil on the bar kills the click, which is the entire point of the switch. You can lightly lube the spring and rails of a clicky if it pings, but leave the clicking mechanism dry.
Lube viscosity, briefly
A working starting point: 105 (a thin oil) on springs to kill ping, 205g0 grease on linear stems and rails, and 3203 (a lighter grease) on tactile stems so you don't drown the bump. To actually do the work you need to open switches and pull them from the board, which is where the puller and opener from the maintenance section earn their keep.
Matching Switch Type to Use Case
This isn't a top-ten list. It's a few honest matchups based on the numbers above.
Gaming
Consistency beats feedback. You want a linear with low pre-travel and a predictable, even force curve so every press registers the same. Tactile bumps and clicks add nothing but distraction at speed. A light, smooth linear like the HMX Butter Linear around 57g is the safe default.
Typing and programming
A tactile with the bump near the top of travel, like the HMX Frog Tactile, lets you feel actuation and ease off before bottoming out, which can reduce fatigue over a long day. If you prefer linears, a slightly progressive spring gives a satisfying landing on the longer words.
Office and shared spaces
There's a clear noise ladder. Clicky is loud and will annoy your neighbors. Standard linears and tactiles are moderate. Silent options like the Gateron Silent Linear and the Turtle Silent Tactile use dampening pads in the housing to mute both the bottom-out and the upstroke, and they're the only socially safe choice in a quiet room. I switched my office board to a silent linear after a coworker started shooting me looks, and the looks stopped.
Endgame curiosity
Once you've felt enough switches you'll start wanting things no factory makes: this housing, that stem, this spring. That's Frankenswitching, and our intro to Frankenswitches shows how mixing parts lets you build a force curve and sound signature to taste.
Price Comparison and Budget Options
Switch pricing has gotten genuinely friendly, and you don't have to spend big to get good. The HMX linears land in the budget-to-midrange band and punch well above their price, which is why they're the ones I hand to people who don't want to drop a fortune on their first good set. For a full board you're usually buying 70 to 100 switches, so the per-switch price adds up fast: even a 50-cent difference per switch is real money across a build. My honest take after buying far too many: the gap between a cheap switch and a premium one is much smaller than the gap between an unlubed switch and a lubed one. Buy a solid midrange switch like the Capybara Linear or HMX Latte Linear, spend the saved money on lube and a couple of tools, and you'll out-feel a more expensive stock switch every time.
How to Test and Evaluate Switches Before Committing
Switch testers vs. a full set
A tester tells you the feel of a single switch in isolation: the bump, the weight, the smoothness. It cannot tell you how that switch sounds in your board, because acoustics come from the case, plate, keycaps, and the room. Use a tester to narrow the type and weight, then accept that final sound is a build-level question.

Switch Samplers from Kinetic Labs
The on-desk thock test
A single switch clicked on a desk sounds nothing like a full board. Board acoustics either mask or expose a switch's character, so judging sound from one switch on a hard surface is a trap. I've watched people at meetups click a switch on a table, declare it the best they've ever heard, then go quiet once it was in an actual case and sounded completely different. The only reliable test is a populated board in the room you'll actually use it in.
Why "less than perfect" switches are great for practice
Before you lube an expensive set, practice on something you won't cry over. B-stock switches are ideal lube fodder, and as we argue in why less than perfect switches are perfect, cosmetic flaws rarely affect how a switch performs once it's in a board. Buy a cheap bag, open them, lube them, ruin a few, and learn the feel. By the time you do it on a set you care about, your hands already know the job.
The short version: stop shopping by color and start shopping by curve. Read the actuation-to-bottom-out delta, check the pre-travel against your use, match the pin count to your PCB, and remember the plate gets a vote. Do that and the full switch selection stops being a wall of marketing colors and starts being a set of measurable choices you can actually reason about.