Emmanuel A.
Jun 19, 2023
•13 minutes
What are VIA and QMK for Mechanical Keyboards?
Unraveling the mystery: VIA and QMK explained! This blog post dives into these essential keyboard firmware platforms and unlock new customization possibilities.
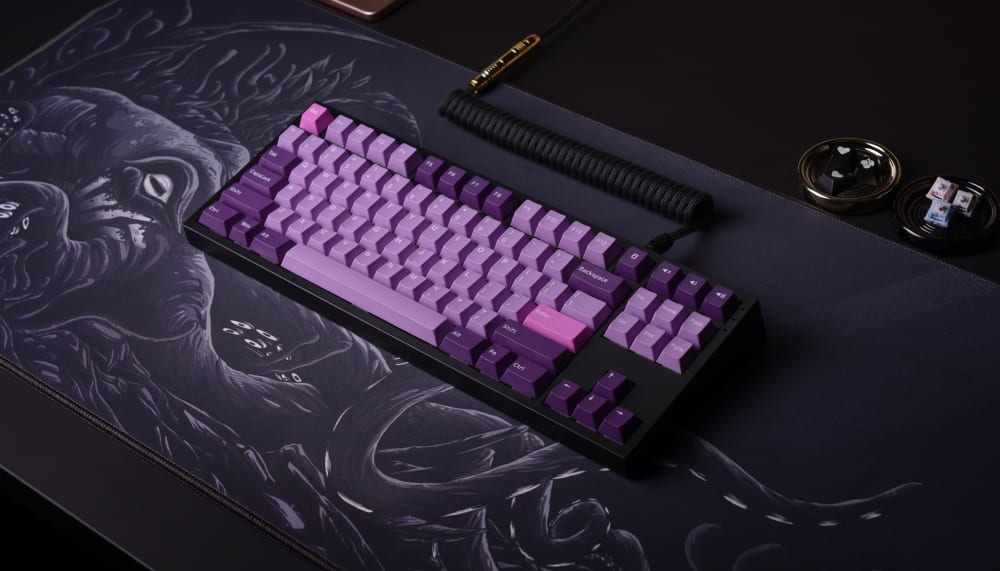

Kinetic Labs Octopus PBT Keycaps on black keyboard
Your love for mechanical keyboards does not automatically imply the understanding of all the technical jargon used in the keyboard space. And unless you’ve always been familiar with keyboard builds and setups, including all of the software and hardware involved, it can be harder to get used to all of the terms used to describe the many essential components of a mechanical keyboard.
But you have less to worry about now, because, in this article, we will be looking extensively into what VIA and QMK are for mechanical keyboards. You may have heard of these terms before, you may even have a vague understanding of what these components do. Or like many too, you may be totally unfamiliar with them. This article will walk you through what VIA and QMK are in very simple terms, such that you’d be able to understand them, irrespective of your previous knowledge.
What are VIA and QMK?
To begin this extensive journey, let’s start by looking into the major similarity factor between VIA and QMK: both are firmware.
But hold up, what is a firmware?


TG67 V2 with WS Cthulhu Keycaps
In very simple terms, a firmware is a set of instructions built into the memory of a hardware that informs the hardware how it should perform its processes. You could liken a firmware to a software, but they are two different things. Software is written in programming language, while firmware is written in machine language so the hardware can read and decipher it, and the firmware is also stored on the particular hardware it is working for.
That said, each hardware, like your keyboard or mouse comes with its own firmware that instructs its processes and helps it communicate with other software and hardware that may be running on your computer.
So yes, QMK and VIA are types of firmware that determine how your keyboard run its processes. The instructions on the firmware helps the keyboard determine things like what each keystroke would do, how the backlight would work, whether or not macros will be functional, and so on.
While there are some other keyboard firmware out there, QMK and VIA stand out from them all because their programs or instructions can be reconfigured so that you are able to customize and personalize your keyboard usage. There is also TMK, a firmware that can be reconfigured. TMK is however so complicated that many never have fun using it and would just go for QMK and VIA instead.
Other firmware types would require you to download proprietary software in order to be able to reconfigure them. These software, may however not be as heavily customizable as QMK and they can also end up slowing your computer down due to their size.
The major reason why most mechanical keyboard users would look into exploring their keyboard firmware is in order to modify the keymap. Modifying your keymap lets you do a whole lot of customizing and programming beyond what a keyboard manufacturer would give you. It will also let you fine tune things to suit your taste, even to the tiniest of details like what each keystroke would do and how the backlight of your keyboard would work.
Understanding how keyboard firmware work therefore gives you an edge for enjoying the best of experiences when using mechanical keyboards and for building your own mechanical keyboard from scratch.
Let’s move on to looking into each firmware and how it works.
What is QMK?

TG67 V2 with WS GR Irish Keycaps
Depending on how long you’ve been in the business of using mechanical keyboards and how much you delved into their build-up intricacies, you may already be familiar with QMK firmware. QMK firmware is an open-source keyboard firmware and is the most popular for use with mechanical keyboards.
QMK is an abbreviation for Quantum Mechanical Keyboard. The aim of the project is to grant developers and other keyboard users with enough knowledge to build unique QMK firmware for use in customizing their keyboards. This is because before QMK, keyboards came with firmware that are usually not configurable or are super hard to configure and would not allow you to further map your keyboard like you’d want.
Nowadays, many keyboard manufacturers collaborated with the QMK organization in order to provide optimum firmware support and programmability for the keyboards they produce.
Features of QMK Firmware
Custom Keymaps: QMK allows you to create fully customized keymaps for your keyboard. Using QMK, you can design the specific function of each key, and introduce additional functions like modifiers, layers and special actions to keys.
Multiple Layers: QMK supports multiple layers, and therefore lets you assign different functions to each layer. This enables you to create complex key combinations and access additional functions without sacrificing key real estate or consuming desk space by going for a larger keyboard with more keys.
Macros: Using QMK, you can define and assign macros to specific keys. Macros are sequences of keystrokes that automate tasks or execute complex commands with a single key press.
Tap/Hold Actions: QMK supports tap and hold functionality, where tapping a key performs one action, while holding the key performs a different action. This feature allows you to access additional functions without needing to switch layers.
Leader Key: The leader key feature lets you assign custom actions or macros to a specific key combination. This can be useful for executing frequently used commands or launching applications.
RGB Lighting Control: Many keyboards with RGB lighting support can be controlled using QMK. You can customize the lighting effects, colors, and patterns directly from the firmware.
Support for Various Keyboard Layouts and Switch Types: QMK supports a wide range of keyboard configurations, including different layouts (such as ortholinear, split, or ergonomic), different matrix sizes, and various keyboard switch types.
Advanced Keycodes: QMK provides an extensive set of advanced keycodes, allowing you to create complex key combinations, implement media controls, control mouse movements, and more.
How Does QMK Firmware Work?
The QMK firmware either automatically comes with your mechanical keyboard or you choose to flash the board with the firmware. The firmware works like a suite and hosts a couple of other tools, such as QMK toolbox and QMK Configurator. It also comes with multiple layers which you can store different configurations on for use on different operating systems. That way, you can set up unique customizations for Windows and Mac in separate layers in the same firmware, allowing you to use your keyboard effectively with different operating systems.
You can modify your keymap using a QMK build environment or using QMK Configurator. Using a QMK build environment seems to be a complicated affair for some, but using the QMK Configurator is quite easy.
Whichever option you choose, however, you would need to reflash the new keymap configuration into your keyboard. For every modification you make to your keymap, you will always have to flash the file into your board. Configuring QMK would also require some programming knowledge.
What is VIA?


VIA Your Keyboard's Best Friend
VIA works like an add-on firmware to QMK, and it lets you modify your keyboard’s keymap without you having to reflash the firmware with every modification and without having to program any instructions. Also, all the modifications you make remain on the keyboard, such that even when you unplug and replug it, or connect it to a new computer, the keymap configuration will still be retained.
VIA also comes with tools to work with, which are VIA Firmware and VIA Configurator. The VIA firmware is pretty much the same as QMK firmware, except that the former now has the VIA_ENABLE feature enabled. The configurator then lets you do all your modifications, including keyboard remapping, light control, macros programming, and layout controls.
Features of VIA
VIA allows you to perform the basic customizations QMK offers including RGB lighting, layer customization, macros, and remapping, although QMK offers more comprehensive reconfiguration options. In addition to these, here are the distinct features of VIA:
Persistent Keyboard Memory
Unlike QMK, VIA stores all of your modifications permanently, such that you can utilize your settings wherever you are. For example, you can switch between using a VIA configured keyboard at home and at work and you can travel with one without using all of your modifications when you unplug the keyboard.
Ease of Use
Asides from the persistent memory, the ease of use is one of the features that has helped VIA gain popularity over the years among mechanical keyboard lovers. The VIA Configurator provides an easy option for modifying your keymap without all the programming and technicalities that accompany using QMK firmware alone.
Profile Management
VIA firmware often supports the creation and management of multiple profiles. This allows you to switch between different configurations quickly. Each profile can store unique keymaps, macros, and lighting settings, making it convenient for you to switch between different usage scenarios or user preferences.
How Does VIA Work?
VIA, for the most part is not an independent keyboard firmware that can work solely on its own. Rather, when you enable it, it begins to communicate with the other firmware on the device (such as QMK), and send commands to it via USB. So the VIA firmware is essentially the communication link between the VIA Configurator, which lets you store all your unique keymap modifications and the initial firmware, which usually does most of the modifications.
The VIA Configurator works like a template and does not require you to program any instructions unlike QMK. You would simply have to select a key and assign the function of your choice to it.
The first thing to do when using VIA firmware is to ensure that the VIA_ENABLE feature is enabled before it is flashed to the keyboard. It is also important to confirm that the keyboard supports the use of VIA.
Like QMK that requires reflashing the firmware with every modification, VIA also comes with its own limitations. Some QMK features like Tap Dance are not enabled on the VIA Configurator. To be able to harness all of the features of QMK while still using VIA, therefore, you would need to set up QMK build environment. Also, not all keyboards have added support for new VIA features yet. For example, the option to change rotary encoder keycodes was not initially available in VIA; and now that it is available, not a keyboards have supported the feature in VIA yet.
How to Use VIA
Before now, you would have to download VIA to be able to use it. You no longer have to download VIA now, however, as you can just launch the web-based version through the website. Once VIA is open and loaded in your browser, it automatically detects your keyboard, if it is plugged in and if it supports VIA use. You would not have to download any programs or be concerned about the space those programs would take up on your computer and how that impact your computer speed.
How to Configure Keys Using VIA
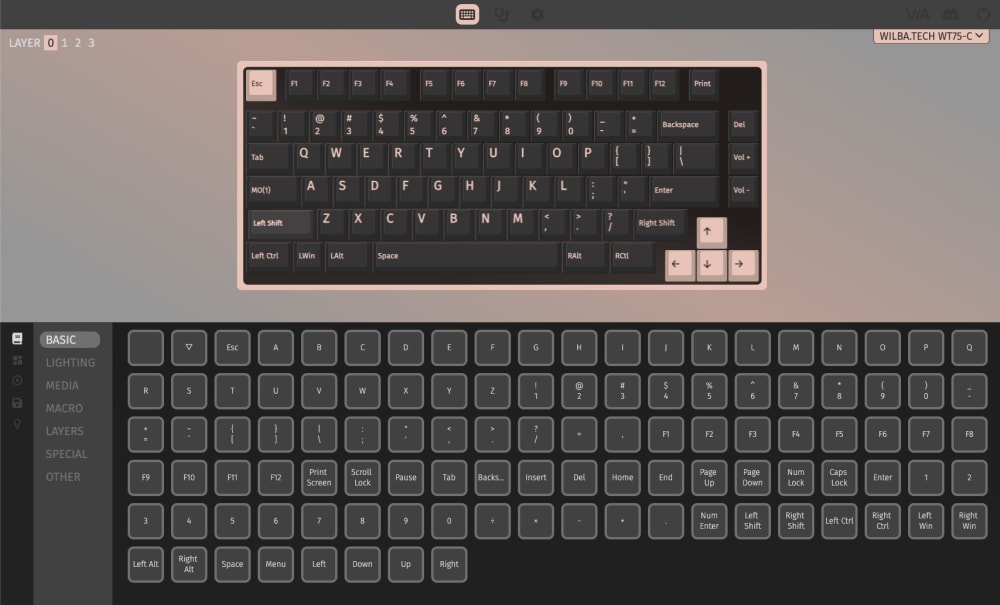

VIA's Configurator Page
- Once VIA is launched, you would see a keyboard layout on the top half of your screen.
- Select the key you'd want to configure in this top half.
- Select the key, function, or command you'd want to assign to it in the lower half.
- You would also be able to configure a group of keys to perform one command of function instead of just one key performing a function.
How to Test Your Key Configurations
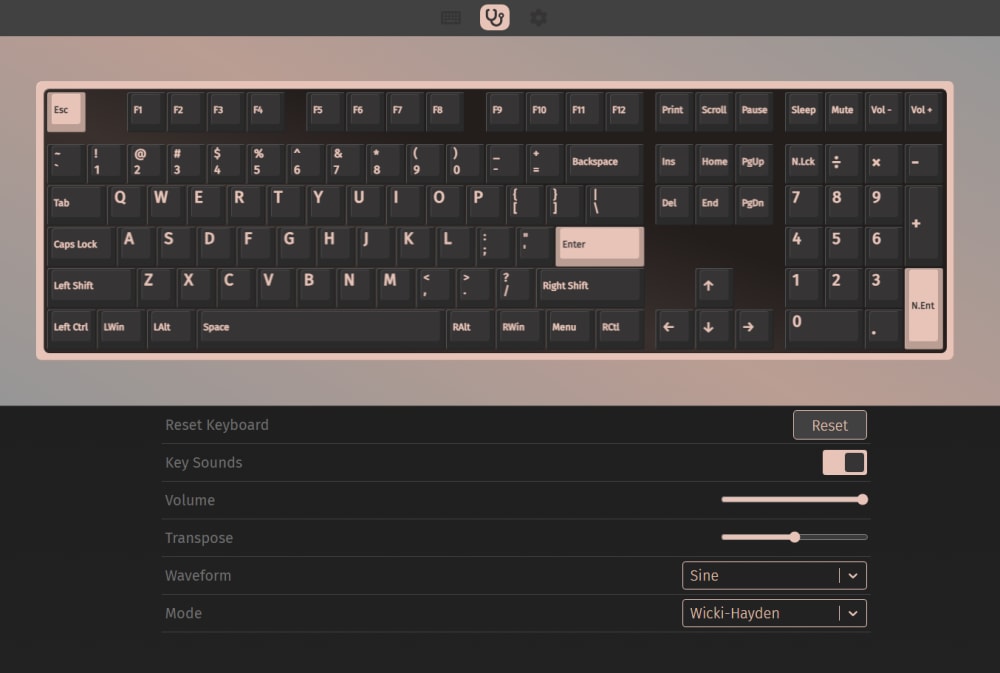

VIA's Key Tester Page
- After you're done configuring your keys, switch to the Key Tester tab.
- On the top half of your screen, which showcases the key on your keyboard, select the key you just programmed and want to test.
- In the Key Tested section, the function assigned to the key will light up, and this indicates that the keypress corresponds to that function.
How to Configure Keys in Layers
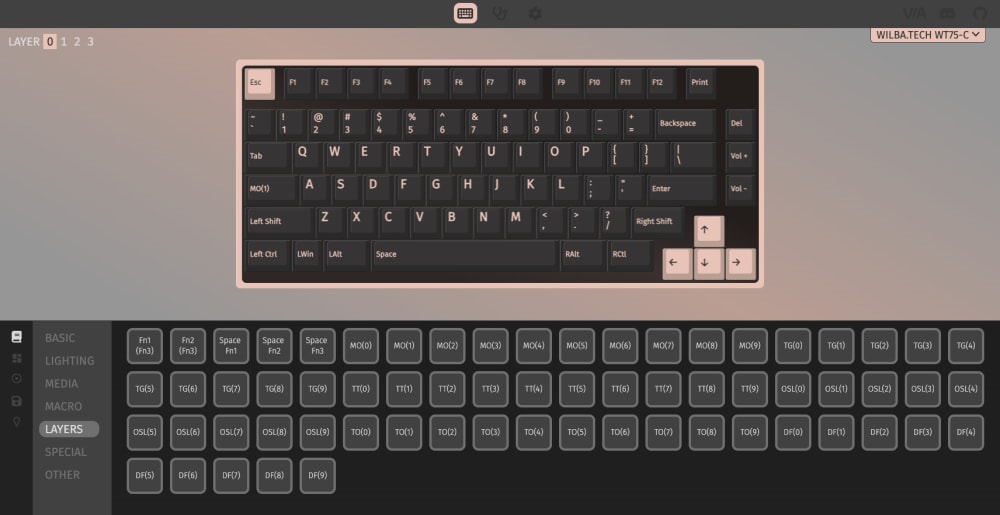

VIA's Configurator Layer Section
You can also configure keys in layers. That is, you can use a single key to perform multiple functions. This is a desirable feature when you are using a small keyboard that does not possess enough physical keys to accommodate all your functions. For example, you can assign numbers as layers to some of the letter keys on your keyboard if your keyboard does not contain a number pad. You can also do the same for the function keys if your keyboard does not come with them. Here are the steps to follow to achieve this:
Under the configure option, you will find the number of layers in each key can accommodate just above your keyboard outline.
- You will find the numbers 0, 1, 2, 3,… in that order.
- In you first layer of key configuration, 0 will be highlighted.
- Move across the numbres from 0 to 1 and so on to configure each key to multiple functions.
The number of layout configuration you can have per key would depend on your keyboard model. You would find the number of layout you can possibly have with your keyboard displayed on the screen below your keyboard when you click on the layout tab. Move across layouts by simply selecting any of the layout options that appear.
Note that your keyboard size can also affect the types of layout it can accommodate. Whatever the case, the keyboard model is what ultimately determines what layout options you can get.
Yes it is. Although, admittedly, it is not a particularly straight forward route. Doing this requires excellent knowledge of QMK and a keen interest for getting into the nitty gritty of the programming of keyboard firmware.
The best thing to do if you are just buying a keyboard is to ensure you go for one that supports VIA. The same applies to QMK too as not all keyboards support QMK. If your keyboard supports either or both, however, you should be able to find that highlighted among its features. Otherwise, visit the QMK or VIA repositories on Github to determine what keyboards they can work with.
Asides from the general headache associated with figuring out which is which and what each hardware and software component of a mechanical keyboard does, there is also this timeless confusion between the QMK and VIA, what each one is, what they do specifically in a mechanical keyboard, and how they work together.
In this article, we’ve been able to extensively look into both, what they have in common, and the distinct features each one possesses. With adequate knowledge on how keyboard firmware work, you’d never have to be confined by what a keyboard manufacturer offers again. You now stand a chance to remap, customize, and reconfigure your keyboard into whatever standards you deem fit for you!